Tag Archives: eggs

Fun Easter activities for all the family

Now that the school holidays are nearly upon us, it is a great time to get out those paints and glue, eggs and flour and get creative.  Or better still make your children get creative.

Easter baskets

Easter Baskets:  https://wartimehousewife.wordpress.com/2011/04/02/what-ive-been-doing-instead-of-writing-articles-for-you

Hot Cross Buns


Hot Cross Buns:  https://wartimehousewife.wordpress.com/2010/04/01/things-to-make-and-do-at-easter-part-4

Egg decorations


Faberge Egg Decorations: https://wartimehousewife.wordpress.com/2010/03/31/things-to-make-and-do-at-easter-part-3

Simnel Cake


Simnel Cake:  https://wartimehousewife.wordpress.com/2010/03/30/things-to-make-and-do-at-easter-part-2

Egg cosies


Felt Egg Cosies:  https://wartimehousewife.wordpress.com/2010/03/29/things-to-make-and-do-at-easter-part-1

6 Comments

Filed under Seasonal

Decorated Chocolate Easter Eggs – using real eggs

As Easter approaches, I have been trying to think of interesting ideas for eggs or gifts.  It occurred to me that one could decorate real eggs and fill them with chocolate.  If you saw one of these in John Lewis they would cost you a fortune and rightly so as they look so glamorous.

You could have a lot of fun with the designs, using applique, stippling, marbling, or just using a bit of ribbon and some stick-on gems as I have done.  I have a big bag of ribbons, sequins, sparkly things etc so I tend to use what I already have in stock.  This is what I did:-

DECORATED CHOCOLATE EASTER EGGS

Make a hole

Utensils:
1 x large needle
Kitchen roll (paper towel)
1 x heatproof bowl for melting the chocolate
1 x saucepan
Icing syringe
Acrylic paints – matt and/or metallic
Acrylic varnish for matt paints
Paint brushes – thick & thin
Ribbons – assorted
Decorative gems

Melt the chocolate

Scissors
PVA glue
Egg cups
4oz / 120g good quality chocolate per egg

Method:
Using the needle make a hole about ¼ “ / 0.75cm diameter in the bottom of the egg
Waggle the needle gently inside the egg to break up the yolk
Drain the egg into a bowl for use as omelettes or to make a cake

Fill the egg with chocolate

Rinse the inside of the egg thoroughly and leave to drain and dry on a towel
Bring some water almost to the boil in the saucepan and place the heatproof bowl on top
Break the chocolate into pieces and place in the bowl
Melt the chocolate, stirring occasionally
Pour the chocolate into the syringe and fill the empty egg shell, leaving a little space for expansion
Wipe any excess chocolate off the shell and leave in a cool place to set
Paint the egg with several thin coats of acrylic paint, making sure not to get any paint on the chocolate
It’s best to do most of the top half first, leave it to dry and then do the remaining bottom bit
When the paint is dry, varnish if you need to and leave to dry

Paint the egg

Then decorate with ribbons and gems, fixing into place with a little PVA

When you come to eat the chocolate, hit the egg quite hard on the side and roll it a bit to crack the shell, a bit like you’d do with a hard-boiled egg.  Then peel the shell off and eat.

A box of eggs

The sadness and yet, the joy!

7 Comments

Filed under Food Presents, Seasonal, Slider

Tyneside Floddies all mine, all mine…

Bacon Floddies, a sort of potato cake, are a tradition part of a Tyneside breakfast and would be served with eggs and sausages.  Apparently they originated on the canals where the navvies would cook them on their shovels over the fire.

TYNESIDE FLODDIES

Utensils:
1 x potato peeler
1 x grater
1 x tea towel – clean!
1 x mixing bowl
1 x large frying pan
Kitchen roll (paper towel) to drain

Ingredients:
10oz / 300g potatoes – peeled
1 large onion – finely chopped
6oz / 180g bacon – rinds off and finely chopped
2oz / 60g self raising flour
2 eggs
oil for frying

Method:
Grate the potatoes onto the tea towel
Gather it up and squeeze the liquid out of the potatoes
Put the chopped onion into a bowl and add the potatoes, bacon and flour
Season to taste
Beat the eggs into the potato mixture
Heat the oil in the frying pan to a medium heat
Put ample tablespoonfuls of the potato mixture into the frying pan and flatten them out to form round cakes
Cook on each side until golden brown and cooked all the way through – about 4 minutes each side
Lift out of the pan and drain the oil off on the kitchen paper
Serve immediately with fried eggs and good sausages and shovel it down!

7 Comments

Filed under Food, Recipes, Regional, Slider

Welsh Rabbit or is it a Rarebit?

Welsh Rarebit is one of those recipes that people mistake for cheese on toast but it is so much more than that.  Aldin’s cafe in Market Harborough makes a Welsh Rarebit that will have you weeping with joy and scraping furiously at your arteries with a teaspoon, but by Jove it’s worth it.

The dish seems to have originated in the 18th century as a tasty supper or tavern dish.  The origin of the name seems a bit hazy and ‘rarebit’ could have been a version of the word ‘rabbit’.  It may have alluded to the fact that many Welsh people were poor and rarely had meat, and rabbit was considered poor man’s meat.  It all sounds a bit tenuous to me – we always called it Welsh Rabbit at home.  And frankly, I’m so posh that when I say ‘rabbit’ it sounds like ‘rarebit’ anyway.  I also read a children’s story on The Light Programme.

WELSH RABBIT

So much more than cheese on toast

Utensils:
1 x grater
1 x heavy saucepan

Ingredients:
2oz / 60g butter
8oz / 240g Cheddar cheese – grated
½ teaspoon English mustard powder
1-2 egg yolks
2 tablespoons beer
4 slices of tasty bread – toasted

Method:
Melt the butter in the saucepan over a low heat
Stir in the cheese and mustard until melted– season to taste
If it starts to separate, add the egg yolks one at a time
Stir in the beer
Spread the mixture on the toast and pop under the grill until starting to brown nicely
Alternatively, put the toast on a plate, spread the cheese on top and brown with a kitchen blow torch

Today’s blog is dedicated to Phyllis Browning

18 Comments

Filed under Food, Recipes, Regional, Storecupboard

Bread Pudding

Bread Pudding has been around since the 11th century and is an excellent way of using up stale bread.  Nowadays, shop bought bread doesn’t go stale in the same way as home-made bread, because of the preservatives, but crusts or loaf ends sometimes get left behind, so you can use those.  I had a bag of white rolls which Boy the Elder brought back from Scout camp.  We ate a couple, but we’re not really white bread people, so they went into the bowl with some seeded, wholemeal crusts which were on the turn.

I made this yesterday evening and we had it hot for pudding with cream and then we all had a slice, cold, for breakfast.  And very nourishing it was too; bread, milk, eggs, dried fruit and not too much sugar – that’ll stick ‘em to the ground.

BREAD PUDDING

Utensils:
1 x large mixing bowl
1 x grater
1 x pair of freshly washed hands
1 x oven-proof dish, about 8×10” – buttered
Foil

Ingredients:
8oz / 240g bread
10oz / 300g dried fruit (I used raisins)
2 teaspoons mixed spice (pumpkin spice for the Colonies…)
½ pint / 300ml milk
1 large egg (or 2 bantam eggs)
3oz / 90g dark brown sugar
the grated zest of 1 orange OR lemon
3oz / 90g butter – melted
2 tablespoons demerara sugar*
a little nutmeg to taste

Method:
Pre-heat the oven to 160 / 3 / 325
Tear the bread into pieces and place in the large bowl with all the other ingredients except the butter and demerara sugar
Leave to soak for 20 minutes
Mash it all up together with your hands, squeezing and squelching until it’s well mixed
Add the melted butter and stir in well
Pour the mixture into the ovenproof dish
Sprinkle with the demerara sugar and a little nutmeg
Bake for 1 ½ hours, covering with foil for the last half hour to stop it browning too much
Cut into squares and serve hot or cold

* If you haven’t got Demerara sugar, mix 1 tablespoon of white and 1 tablespoon of dark brown sugar together

27 Comments

Filed under Food, Leftovers, Recipes, Storecupboard

Nettles – the free alternative to Spinach

In which the Wartime Housewife points out that nettles gathered from the hedgerow are free whilst spinach costs over £1 per bag.  Plus a recipe for Egg Florentine Au Naturel.

Nettles - free food

While Boy the Elder was tramping through the Brecon Beacons this weekend, Boy the Younger and I decided to strike out into the countryside ourselves.  When BTY fell off his scooter for the 3rd time, he got, complaining miserably that he had been stung.  And so he had.  The very first nettles were peeping through the brown, sodden remains of last year’s foliage, vivid green and packed full of venom.

It won’t be long before we can start having Nettle Soup again! we cheered.  But nettles are a perfectly good vegetable in their own right.  The other dish I really like to make is Egg Florentine which is usually made with spinach (which is the ‘Florentine’ bit) but can be made equally well with nettles. It would make an incredibly nourishing breakfast dish as well as a light lunch.

How to prepare nettles for eating

I’m sure I don’t need to tell you to wear rubber or thick gardening gloves when harvesting nettles.  Always use the young tender leaves or the tender tops off older plants.  Get rid of any tough stalks and give them a good wash to get rid of any insects or anything else you wouldn’t want to eat.  Then treat them just like fresh spinach.

EGG FLORENTINE

Utensils:
Rubber gloves
1 x small saucepan or poaching pan
2 x medium saucepan

Ingredients:
½ carrier bag of nettles
4 eggs
1 knob of butter
1  quantity of cheese sauce – see below
a little paprika

Method:
Make the cheese sauce and keep it warm
Place the nettles into a medium saucepan with a little water and a knob of butter
Cover and steam until tender
Soft boil or poach the eggs
Drain the nettles and divide between 4 plates
Place one egg onto the top of each pile of nettles
Pour cheese sauce over the top of each
Sprinkle with a little paprika and serve immediately

Cheese sauce
2oz / 60g butter
2oz / 60g wholemeal flour (or 2 really heaped tablespoons)
4oz / 120g cheese – grated
½ pint / 300ml milk
1 pinch mustard power / ¼  teaspoon ready made mustard

Method:
Meanwhile, melt the butter in a pan then slowly
Stir in the flour and mustard powder to make thick paste (a roux)
Add the milk a bit at a time, stirring constantly
Simmer gently until the sauce has thickened slightly and then stir in the cheese

The sauce can also be done in a bowl in the microwave.  Follow the steps above but instead of simmering in a pan, pop the bowl in the microwave for about 3 minutes, taking it out to stir occasionally.

8 Comments

Filed under Food, Hedgerows, Nutrition & Sensible Eating, Recipes, Seasonal

Breakfast is all the Raj! So here is a recipe for Kedgeree

Kedgeree is a simple and highly nutritious dish which originated in India.  The Indian version contained lentils, rice and onion and was known as khitchri.  The English, of course, anglicized it, hence ‘kedgeree’, and adapted it in the 18th century to suit their taste by adding boiled eggs and fish.

It is frequently served as a breakfast dish, but also makes a delicious light lunch or supper.  Personally, I love a big breakfast, particularly as I’m not a morning person, as it gives me energy and I feel much more cheerful and ready to face the day.  Sadly, I usually just stuff down a slice of toast and consequently I’m really flagging by 11 o’clock. 

I had a seriously good fry up this morning at the Antiques Market; Steve excelled himself and topped it off with a couple of thick slices of black pud.  Cured my hangover a treat.

For more breakfast ideas, see my previous post.

KEDGEREE

Utensils:
1 x medium saucepan
1 x large saucepan with a lid
1 x small saucepan
1 x small frying pan
1 x chopping board

Ingredients:
1lb / 480g smoked haddock
½  pint / 300ml milk
1 pint / 600ml water
6oz / 180g long grain rice
1 pinch chilli powder
2oz / 60g butter
1 medium onion – finely chopped
2 eggs – hard boiled and roughly chopped
lemon wedges to garnish and squeeze
Fresh chopped parsley to garnish

Method:
Pour the milk into the medium pan and heat to a gentle simmer
Add the fish, topping up with a little water if necessary so the liquid just covers the fish
Poach for about 8-10 minutes or until just cooked
Remove the fish from the pan and remove the skin and bones
Break into flakes with a fork
Boil the water in a large pan and add the rice
Give it a stir, put the lid on and simmer until all the water has been absorbed
Add the chilli powder and any salt and pepper if you wish
Heat half an ounce of butter in a frying pan and add the onion
Cook gently until soft and transparent then remove from the heat
Stir the remaining butter into the hot rice then add all the other ingredients
Garnish with a sprinkling of parsley and the lemon slices

7 Comments

Filed under Food, Nutrition & Sensible Eating, Recipes

Things to Make and Do at Easter: Part 3 – Egg Decorations

FABERGE STYLE EGG DECORATIONS

These eggs are so simple to make but look wonderful, particularly if you hang them on a small branch.  You can buy sheets of bead stickers and ribbon stickers at craft shops and good stationers, and haberdashers with have ribbons and beads and often have bags of off-cuts or assorted oddments which are perfect for this sort of thing.

Think through your design before you start and lay your materials out.  They take a little bit of time, but you can go off and do other things while they’re drying.  And of course you can use the egg to make Hot Cross Buns and Simnel Cake.

You will need:
Eggs for blowing
A sharp, long, thick needle
Acrylic paints
Paint brushes – assorted sizes
Clear varnish to make them extra hard
Beads, ribbons, stickers etc for decorating
1/8” / 5mm ribbon to make hangers
PVA glue (because it dries clear)
Scissors

Method:
Make a very small hole at each end of the egg
Poke your needle into the egg to break it up
Position your egg over a bowl and blow through one end until all the egg is out
Leave to dry
Paint your egg carefully with acrylic paint.  You will need more than one coat to get a thick, dense colour, leaving to dry between each coat
When all the coats of paint are dry, apply the varnish to the whole of the egg and leave to dry
Decorate with beads, ribbon, stickers etc and leave to dry

To make the loops:
Cut a length of thin ribbon about 6 times the length of the egg and thread onto the needle so that the ribbon is exactly in half
Thread the ribbon through the bottom hole and out through the top hole, leaving the two ends hanging out of the bottom
Tie off the ribbon neatly at the bottom so it can’t slip through the hole
Put a tiny dab of PVA glue around the hole at the base of the ribbon to set it firm and leave to dry

Post Script 19.04.11:  You can thread the ribbon through a medium sized coloured button on the bottom and glue it on.  This completely covers the hole and makes a very neat finish.

1 Comment

Filed under Children, Decorative, fashion, Indoor Activities, Leisure, Seasonal

Chickens and How to Use Them – Day 1: roast chicken, stuffing and stock


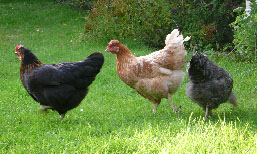
Happy Chickens

Happy Chickens

I love chickens.  They are very pleasant creatures, with a friendly calming disposition and can be kept for their utterly delicious eggs even in a relatively small garden.  Also one moderately sized bird (about 4lb / 1.9kg) can make several economical meals if it is used to its full potential.

I based the following on feeding a family of four.

DAY 1:  ROAST CHICKEN

1.     Pre-heat the oven to 200 / 400 / 6

2.     Stuff with Simple Stuffing detailed below

3.     Sprinkle the chicken with mixed herbs and a little paprika.

4.     If you hate cleaning your oven, wrap the chicken in foil and put it in a roasting tin

5.     Place in the oven for 20 minutes

6.     Turn the heat down to about 140 / 275 /1 and cook for about an hour

7a.   If you’re using foil, turn the heat up to 200 / 400 / 6 again and open up the foil on top and put the bird back in to crisp up for 10 minutes.  To test if the chicken is cooked, dig a fork deeply into the bit between the leg and the body.  If the juices run clear then it’s cooked.  If they are pink or have red bits in, give another 15 minutes and then test again.  Presuming the chicken is cooked, go to 7b.

7b.   If you’re not using foil, turn the oven off and leave to rest in a warm place for 15 minutes while you cook the vegetables.

8.     Carve all the meat off the chicken and set aside half of it for the next day.  Keep the bones, you’re going to need them.

9.     Remove all the stuffing and serve on a plate with the carved roast chicken.  Anything that isn’t eaten is gorgeous in a sandwich with jam or redcurrant jelly.  Really.

Serve with boiled or roast potatoes and at least two different kinds of lightly cooked vegetables and use the vegetable water for the gravy. 

If there are any leftover bones and skin add them to the other bones for stock. 

SIMPLE STUFFING  

1 onion – medium, finely chopped

1 good knob of butter

8oz (250g) sausagemeat

1 tbsp chopped fresh parsley or ½ tbsp dried parsley

1 tbsp chopped fresh sage or ½ tbsp dried sage

Juice of 1 lemon or 2 tbsp bottled lemon juice

Method

1.     Melt the butter in a saucepan over a medium heat and soften the onions until translucent.  Take the pan off the heat.

2.     Add all the other ingredients and mix well with your hands, really squishing it all together.

3.     Stuff it inside the cavity of the chicken.

NB:  If you’re feeling saucy, how about adding a small tin of chestnuts, chopped, to the mixture.  A couple of garlic cloves add a bit of zing as well.

Tomorrow, I’ll tell you how to use the remaining half of the chicken for a tasty peasant style Italian Risotto that is equally nice for vegetarians if you leave out the chicken.

STOCK

1.     Put all the remaining bones and skin into a large pan and cover with water.  Pop in a bay leaf and some 6 peppercorns. 

2.     For a light stock, simmer gently on a low heat for 3-4 hours with a few pieces of    chopped carrot, a bit of celery and a bit of onion.  Strain and use as required..

For a heavier stock follow step one, but keep it simmering for a couple of days, topping up the water, adding any vegetable water you have, and any other bones until the stock is quite dark.  Strain and use as required.

*   *   *

Before I sign off, there must be a Word about Welfare.  I know that it is very tempting to buy two chickens for £5 in the supermarket.  Before you do, have a look at the http://www.chickenout.tv website.  It is  impossible to produce a chicken for £2.50 if it has been cared for properly, with freedom to move, to peck, to roost, socialise and been fed a natural diet.    Chicken doesn’t necessarily have to be completely free range, although obviously that is what we should all be aiming for, but there are plenty of chickens available that have natural light and freedom to roam but which aren’t actually free range.  Yes, they cost more than £2.50 each but a decent chicken will last three meals and I truly believe that with a properly produced bird, who has had time to mature naturally, you don’t actually need to eat as much.  And one more thing.  Before anyone suggests that they can’t afford it, the Wartime Housewife lives on a lower income than most of you can possibly imagine but I would rather go without chicken than eat an animal who has had a miserable life. 

Look out for future blogs on meat buying and cooking with cheaper cuts.

May I extend my grateful thanks to Mr de Worde who kindly sent the photographs of his very beautiful and very happy chickens.
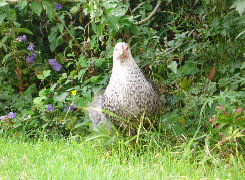
Inquisitive Chicken

Inquisitive Chicken

Three Happy Chickens

Three Happy Chickens

5 Comments

Filed under Ethics, Food, Livestock, Recipes